Random Values from Weighted Ranges with Animation Curves
This article will describe the way that Rogue Tap generates random values that follow a weighted range.
Concept
The random number generation utilities in Unity handle the majority of situations where Rogue Tap needs randomness. However, sometimes I needed numbers that are not evenly distributed across the valid range.
I also wanted to be able to easily modify the range through the editor.
Overview
Rogue Tap uses Unity's AnimationCurve to implement these ranges. The AnimationCurve provides a great way to visualize the range via the editor. Once the curve is configured as desired, it can be sampled to get our ranged, random values. Basically, it is just a function that we can easily manipulate via the editor. We gives the curve one value, and it returns a corresponding value that follows the rules we configured in it.
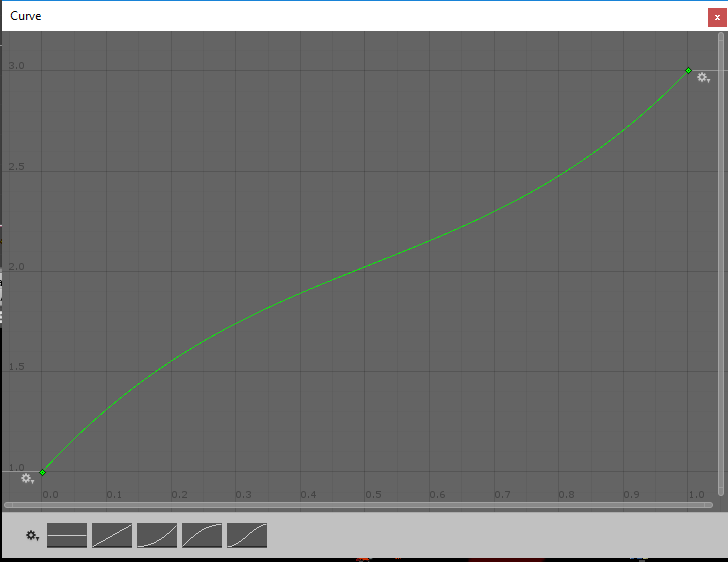
The image shows a vanilla AnimationCurve. Along the x-axis, we have the the values we can use to sample our curve. The curve in the image goes from 0 to 1. This means that the curve has mapped a specific value to every x-input in that range. If we exceed that range (by sampling the curve at a value of 2, for instance), the curve will wrap around until it finds a valid value. Sampling the curve at 3.5, will really just sample the curve at 0.5, because it will wrap around 3 times before ending at 0.5.
Along the y-axis, we have the curve's output values. These are the values we will configure to satisfy our game's needs.
Configuring the Curve
Here is a basic AnimationCurve.
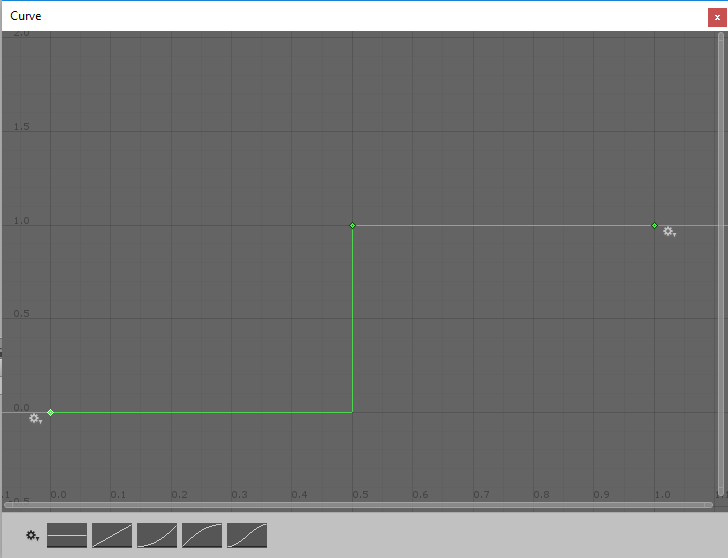
This curve creates a simple distribution. When randomly sampled, half of the time it will return 0 and half the time it will return 1. You can see in the editor by looking at the green line when editing the curve. That green line highlights all the values that this curve can return. If you want to know what this curve returns when sampled at 0.25, you find 0.25 along the x-axis, and then find the height of the green line at that point. (For our basic curve, that is 0.)
Now let's look at how this basic curve was built. We start from the simplest preset curve. To use a preset curve, click one of the options at the bottom of the AnimationCurve editor window.

If we select the straight line preset, we are already halfway to completing the aforementioned basic example. The first change we need to make is to add a "key". "Keys" are kind of checkpoints in the AnimationCurve. They represent the points where we can make changes to the curve. But it would be a huge pain if we had to place a key at every possible value between 0 and 1 (infinite!). We will see how the curve handles that later.
View post on
imgur.com
In the video above, we see the following:
- Add a new key
- Move the new key to x=0.50 and y=1.00 (hold the CTRL key to snap to the grid)
- Move the first key to x=0.00 and y=0.00
- Change the interpolation method for the first key's Right Tangent to Constant
The final step tells our animation curve how to handle all of the values between our keys. Setting it to Constant means that the AnimationCurve will return a constant value between those two keys. To represent this, we see the green line become straight - and it changes suddenly at the next key.
There are two other options for controlling the interpolation between keys.
- Linear - interpolates along a straight line between the two keys.
- Free - interpolates along a curve that starts in the configured direction.
Bear in mind that there are always two keys for each interpolation. So each key gets to have a say in how the interpolation is done and Unity blends them together. For example, if we have two keys configured with the Free interpolation method and we start their curves in opposite directions, we get the following result.
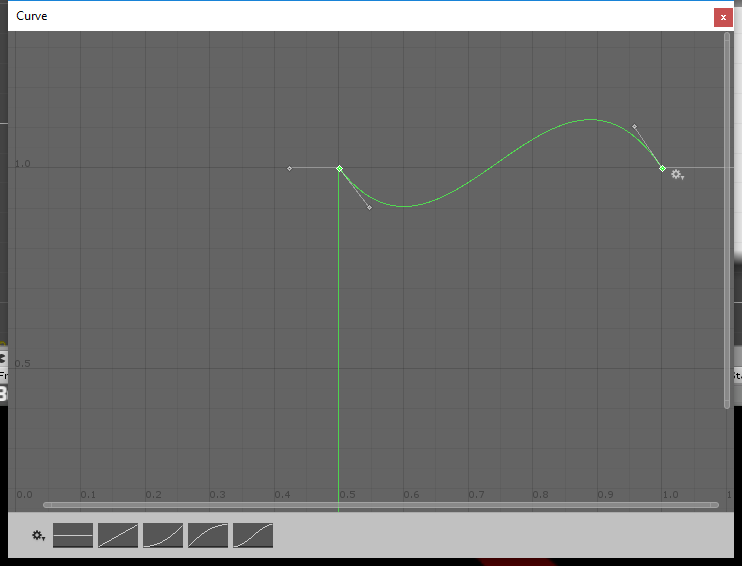
As you can see, Unity blends the two interpolation methods together to yield a single curve.
Sampling the Curve
Now that we have a curve configured as we like, we need to sample it to make it useful. Here is the code for sampling our curve:
//Get a sample value from 0-1 (the valid x-values for our animation curve)
float sampleValue = UnityEngine.Random.value;
//roomEncounters is our AnimationCurve object
//we call the Evaluate method and pass in our sample (x) value to get the mapped (y) value
float distValue = roomEncounters.Evaluate(sampleValue);
It is possible to configure your animation curve to have a valid range beyond 0-1. If you do this, you will need to adjust your sample value accordingly.
// multiply by maxXValue to cover our curves entire value range
float sampleValue = UnityEngine.Random.value * maxXValue;
float distValue = roomEncounters.Evaluate(sampleValue);
Go forth and sample!
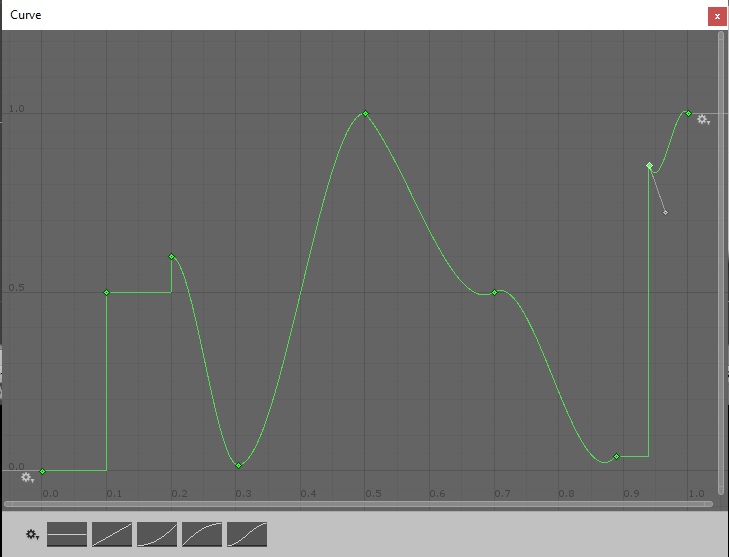
Because the AnimationCurve simply emulates a function, there are many other ways to achieve the same result. However, those ways often involve coding a complex function that cannot be easily configured via the Unity editor. Imagine trying to determine the function that best covers this curve:
Additional Reading
The Unity docs have some more information on this: Generating Random Numbers and Using AnimationCurves.
Get the Game!
Rogue Tap is currently available for free on the following platforms.

Check us out on IndieDB!
